Having the proper equipment is crucial for a flawless, expert finish when it comes to car tinting kits. Tint film, a squeegee, a heat gun, a utility knife, and a spray bottle are all included in a good kit. “How much does a car tinting kit cost?” is a question you may have. Prices range from 200 AED to 1,500 AED, depending on quality and tools. Purchasing a high-quality car tinting kit guarantees long-lasting results and saves money when compared to hiring a professional. The correct kit enables you to consistently achieve a perfect finish, regardless of your level of experience.
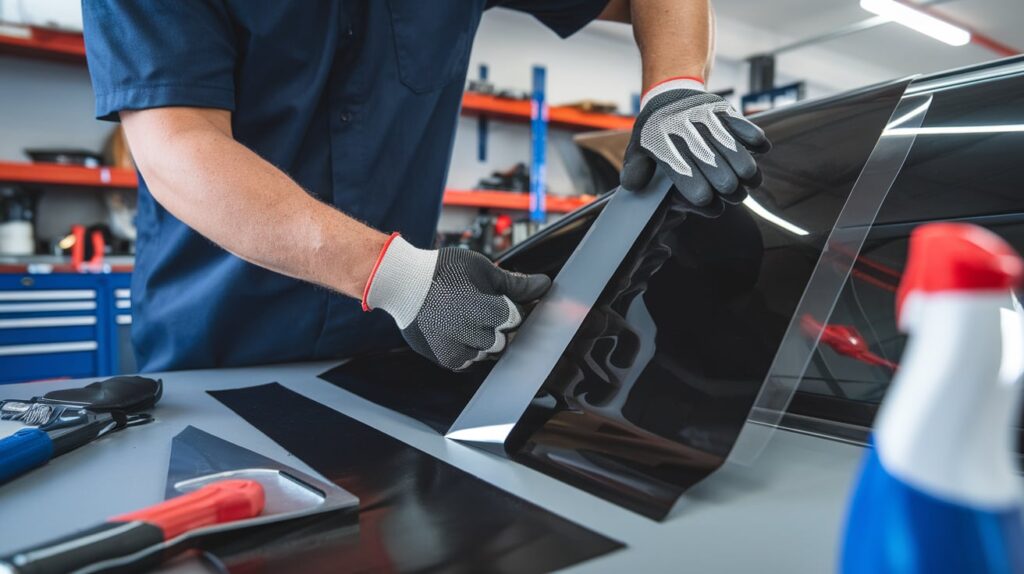
1. Tint Film (The Heart of Car Tinting Kits)
The tint film itself is the focal point of any Car Tinting Kit. The tint film, which comes in a variety of colours and materials (like ceramic, carbon, or dyed), controls how much heat, UV protection, and privacy your car’s windows will have.
How to Apply It:
- Getting ready: Before cutting the film, take precise measurements of your windows. The majority of kits come with pre-cut film, but make sure to cut it to size if you’re using a roll.
- Use: Once the window has been cleaned, carefully apply the film to the glass by removing the backing paper. To eliminate air bubbles, use a squeegee.
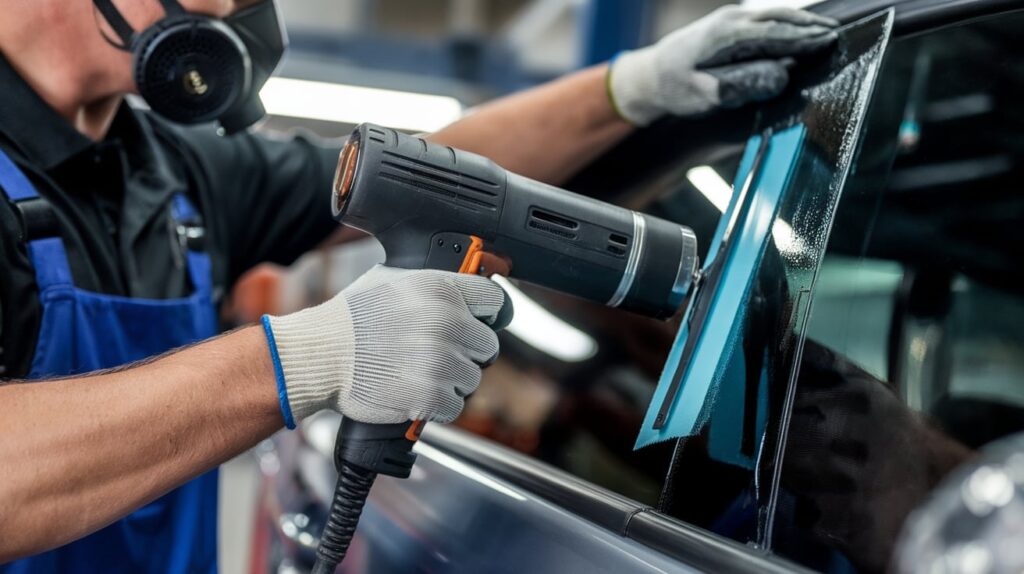
2. Squeegee (For Smooth Application in Car Tinting Kits)
In your Car Tinting Kit, a squeegee is one of the most crucial tools. Applying uniform pressure to the tint film helps remove any trapped water and air bubbles underneath the film.
How to Apply It:
- Putting Tint Film on: Once the tint film is in place on the window, push any air or water beneath it with the squeegee. Move smoothly and deliberately outward from the centre.
- Eliminating Bubbles: If there are persistent bubbles, carefully lift the film and press the trapped air out with the squeegee. Take care not to stretch or harm the film.
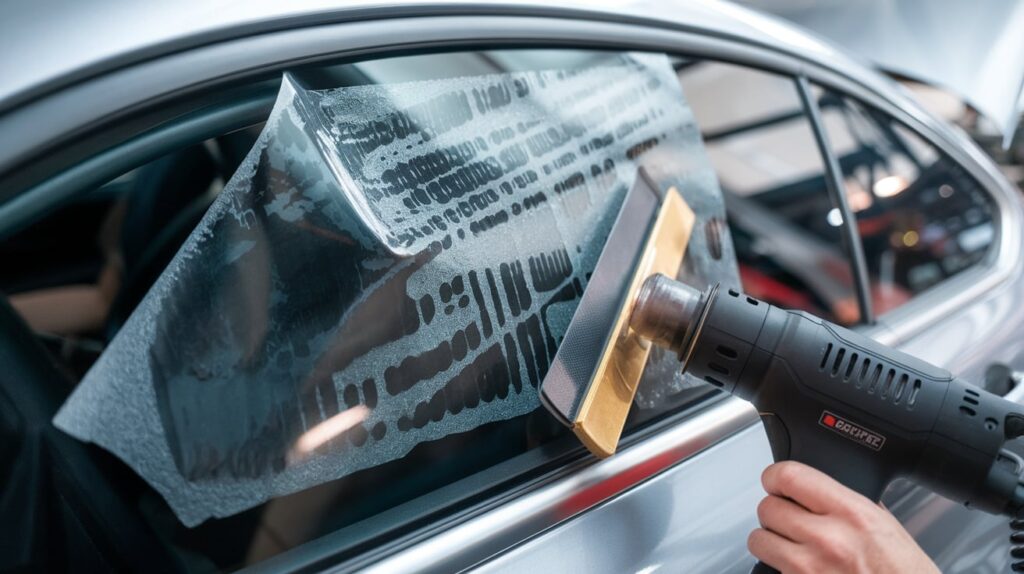
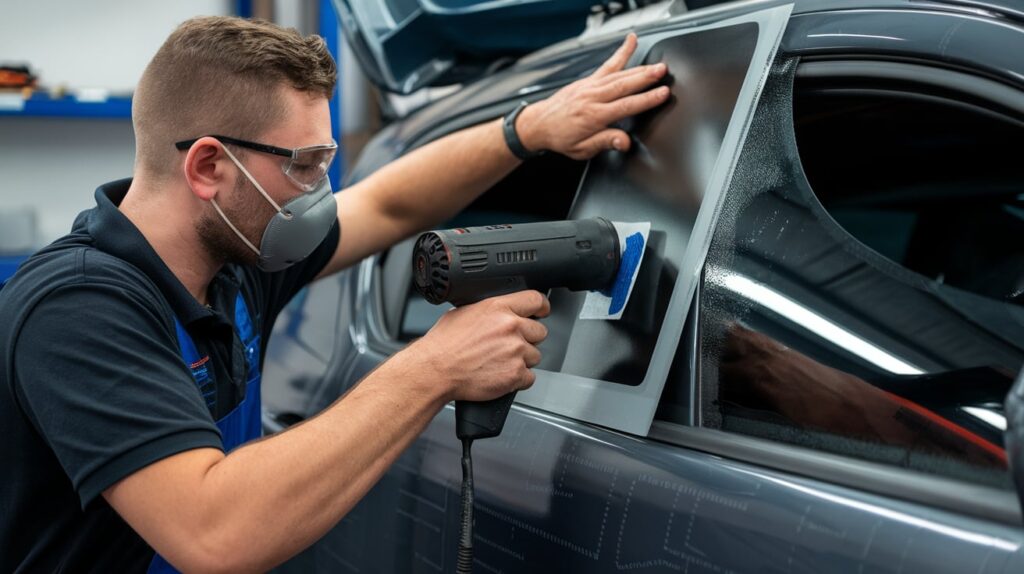
3. Heat Gun (For a Perfect Fit with Car Tinting Kits)
For tinting jobs that require stretching the film to fit curved or challenging areas, like window corners, a heat gun is a must.
How to Apply It:
- Stretching the Film: To increase the flexibility of the tint film, gently heat it with the heat gun. You can stretch the film to fit the window’s shape once it’s warm—not too hot.
- Resolving Wrinkles: After applying the tint film, if there are any wrinkles, gently heat the affected area and smooth it out with a squeegee.
4. Utility Knife (For Precision Cutting with Car Tinting Kits)
A clean, expert finish is ensured by making precise cuts along the window and tint film’s edges with a sharp utility knife.
How to Apply It:
- Cutting the Film: After applying the tint film to the window, trim any extra film from the edges with a utility knife. To prevent breaking the window or the film, cut slowly and carefully.
- Cutting for Curves: To prevent jagged edges, make small, precise cuts rather than long, straight lines in curved areas.
5. Spray Bottle with Solution (For Easy Application with Car Tinting Kits)
Another essential tool in your Car Tinting Kit is a spray bottle that is filled with a solution of water and a few drops of dish soap. It helps avoid air bubbles and lubricates the surface so the film slides into place during application.
How to Apply It:
- Preparing the Window: Liberally mist the window with the solution before applying the tint film. This makes it easier to place the film and lets you move it around before it adheres.
- Clean the Film: Use the spray solution to gently clean the film without causing any damage to the tint if you inadvertently get dirt or fingerprints on it during installation.
6. Microfiber Cloth (For Clean, Scratch-Free Results with Car Tinting Kits)
During the installation process, a microfiber cloth is essential for cleaning your windows and tint film. Because of its gentleness, it won’t scratch or leave lint.
How to Apply It:
- Window Prep: Use a fresh microfiber cloth to clean the windows of any debris or residue before tinting.
- Final Touches: Use the cloth to give the window one last wipe after applying the tint, making sure no water stains or streaks are remaining.
7. Trim Tool (For Edging with Car Tinting Kits)
The tint film’s edges around the window are finished with a trim tool. It ensures that the edges are correctly sealed and assists in pushing the film into confined areas.
How to Apply It:
- Finishing the Edges: To ensure a clean finish and good adhesion, use the trim tool to press the film against the window’s edges after applying it and trimming.
8. Tint Film Applicator (For Consistent Pressure in Car Tinting Kits)
An excellent tool for people who want a simpler application is a tint film applicator. Though it can apply constant pressure over a wider area, it functions similarly to a squeegee.
How to Apply It:
- Film Positioning: Lay the tint film across the window and apply uniform pressure with the applicator. Avoiding uneven areas will be beneficial, particularly for larger windows.
The car tinting kit you select has a significant impact on how your car turns out when it’s finished. The correct kit will give you the equipment, premium film, and accuracy required for a clear, durable finish. Conversely, a subpar kit may result in bubbles, poor adhesion, and a finish that may require redoing sooner than anticipated.
Preparing Your Car for Tinting | Tips for a Clean Installation
Preparation is essential before applying tint film to your car’s windows. For your Car Tinting Kit to produce the best results, it must be installed cleanly, without any dirt, bubbles, or flaws. In addition to improving the final appearance, taking the time to properly prep your car will help your tint adhere better and last longer. Getting Your Vehicle Ready:
- Wash the windows. Completely: Clean the windows to get rid of dust, oil, and grime. Any leftover debris may result in air bubbles beneath the film, which could result in a poor finish. For optimal results, use a microfiber cloth and a non-abrasive cleaner.
- Remove Old Tint (If Applicable): Before beginning the new installation, carefully remove any old tint if you’re replacing it. To make the process easier, use a heat gun or a Car Tinting Kit solution.
- Dry the Surface Completely: To avoid water stains or streaks that could obstruct the application of the tint film, make sure the windows are completely dry after cleaning.
- Use a Spray Bottle for Lubrication: To help lubricate the surface and prevent the film from sticking too soon, use a spray bottle filled with a mild soapy solution.
Advice: Avoid putting the tint on in direct sunlight to guarantee a smooth application. To keep the film from getting too sticky or challenging to work with, work in a shaded area.
Using a Car Tinting Kit, getting your car ready properly is half the battle. A smooth film application on a clean surface avoids problems later and gives you a long-lasting, professional finish. Your Car Tinting Kit will work as efficiently as possible and produce spotless, perfect results if you take the extra time to prepare.
Step-by-Step Guide | How to Apply Tint Using Your Car Tinting Kit
It’s time to start the tinting process now that your vehicle is ready. With the right technique, you can get a perfect tint job thanks to the tools included in the Car Tinting Kit you selected. Applying tint film with your Car Tinting Kit is explained in detail below.
Step 1: Cut and Measure the Tint Film
- To guarantee a good fit, precisely measure the window’s dimensions.
- If you’re using a roll, cut the tint film with a utility knife, leaving a thin edge border for trimming.
Step 2: Apply the window and tint film
- Pour a few drops of dish soap and water into a spray bottle.
- To make repositioning simple, lightly mist the window and the adhesive side of the tint film.
Step 3: Put the Tint Film on
- Beginning at one edge of the window, place the film there and gently press it against the glass.
- Working from the middle of the film to the edges, use the squeegee to push out air and water bubbles.
Step 4: Cut Off Extra Film
- Once the tint film is in place, trim any excess along the window edges with the utility knife.
- For a smooth finish, make sure the cuts are accurate and clean.
Step 5: Last Squeegee and Drying
- To get rid of any last air bubbles, run the squeegee over the film.
- To guarantee correct adhesion, let the tint cure for 24 to 48 hours without rolling down the windows.
Step 6: Examine and Adjust
- Verify that the edges are correctly sealed after the film has dried.
- For a flawless finish, press the film into confined areas or edges using the trim tool if needed.
To avoid the tint getting too sticky and challenging to work with during application, work in a cool or shaded area.
Your Car Tinting Kit will produce a neat, expertly applied finish if you follow each step with care. Not only does this boost your car’s style, but it also extends the film’s durability and effectiveness.
That said, even the best DIY kit has its limits. For long-lasting results, perfect edge sealing, and guaranteed compliance with Dubai’s legal tint percentages, professional car tinting services remain the safer choice. Skilled installers use advanced tools and premium films to ensure flawless application, stronger heat rejection, and zero bubbling issues.
Choosing the Right Tint Film Thickness for Your Vehicle
Not all tint films are made equal, and the film’s thickness has a big impact on how well the tinting works. Selecting the appropriate thickness for your needs is crucial because different thicknesses offer differing degrees of privacy, heat rejection, and UV protection.
Normal Film Thickness (1.5 mil):
- The most popular film thickness provides a good mix of heat rejection, durability, and installation simplicity. Perfect for everyday use and regular cars.
Films with a thickness of 2.0 mil or more:
- These films are more resilient and less likely to fade or sustain damage over time. They are perfect for vehicles that are frequently exposed to sunlight or harsh weather.
1.5–2.0 mil ceramic films:
- Ceramic films combine thin, high-performance construction with UV and heat protection. Despite being thinner, they provide superior protection without sacrificing vision.
By selecting the appropriate film thickness, you can be sure that your car tinting kit will satisfy the unique privacy, security, and aesthetic requirements of your vehicle. To choose the ideal film, take into account elements like the climate and the amount of sun exposure your car receives.
Cost of a Car Tinting Kit vs. Professional Tinting Services in AED
Cost is an important consideration when choosing whether to use a car tinting kit or hire a professional tinter. Both choices have unique advantages, and being aware of the price variations will enable you to choose the one that best suits your needs for car tinting in Dubai and your budget.
The prices of using a car tinting kit and hiring a professional in Dubai are contrasted below. The typical price range for each is shown in this table, which accounts for the initial cost, included tools, and other variables.
| Option | Price Range (AED) | What’s Included | Pros | Cons |
| Car Tinting Kit | 200 AED – 1,100 AED | Film, squeegee, utility knife, heat gun, spray bottle | One-time investment, DIY satisfaction, no labor fees | Requires time, skill, and effort, and risk of errors |
| Professional Tinting | 550 AED – 1,800 AED | Labor, professional-grade film, installation fees | Expert installation, guaranteed results | Higher upfront cost, no DIY control |
Car Tinting Kit:
Cost:
- Usually between 200 and 1,100 AED, a car tinting kit comes with all the necessary equipment for a do-it-yourself tint job, including film, a squeegee, a utility knife, a heat gun, and a spray bottle.
- It’s a one-time investment, despite the initial cost appearing high. You can save money on labour costs for subsequent installations by using the kit for multiple tint jobs once you have it.
Advantages:
- Future tinting projects are covered by this one-time investment.
- Long-term savings because there are no labour expenses.
- DIY fulfilment and the opportunity to pick up new skills.
Cons:
- Takes time and work because you have to do the tinting yourself.
- Error risk, such as air bubbles or uneven application.
- Learning curve if you’ve never done it before.
Professional Tinting Services:
Cost:
- Depending on the type of film, the number of windows, and the size of the vehicle, professional tinting services normally cost between 550 and 1,800 AED. This price covers both labour and the premium films that experts use. The location and the tint shop you select can affect the cost.
Advantages:
- High-quality, long-lasting results are guaranteed with expert installation.
- No chance of errors or subpar film application.
- Saves you time and effort because the entire process is handled by professionals.
Cons:
- More expensive up front than do-it-yourself kits.
- The satisfaction of a do-it-yourself project is lost.
- Lack of authority over the particular tinting procedure.
A car tinting kit is an affordable choice if you want to reduce long-term expenses and enjoy the satisfaction of a DIY project. On the other hand, professional tinting services might be worth the higher upfront investment if you value convenience and guaranteed results.
In the end, the decision depends on your budget, comfort with DIY projects, and how much you prioritize expertise and time savings. If you’re weighing the cost differences, our detailed guide on Car Window Tinting Prices in Dubai explains what impacts pricing—from film type to installation quality, so you can make the best choice for your situation.
Whether you’re doing it yourself or hiring professionals for a perfect finish, selecting the right car tinting kit or professional service guarantees you get the desired results.
The Benefits of Ceramic Tint Films in Your Car Tinting Kit
With good reason, ceramic tint films are becoming more and more common in car tinting kits. These films have cutting-edge qualities that distinguish them from conventional metallic or dyed tints, offering better durability, UV protection, and heat rejection.
- Heat Rejection: Ceramic films keep your car cooler and require less air conditioning because they block more heat than conventional films.
- UV Protection: They offer superior UV protection, which guards against skin damage and keeps the interior of your car from fading or cracking.
- Durability: Ceramic films are an excellent long-term investment because they are more resilient to fading and discoloration.
- Clarity: Ceramic films, as opposed to metallic ones, won’t obstruct radio reception, GPS signals, or mobile connectivity.
By including ceramic film in your car tinting kit, you can enjoy one of the most advanced window tinting technologies available today. Ceramic tint blocks higher levels of heat and UV rays compared to traditional films, while still giving your vehicle a sleek, modern look.
For drivers in Dubai, upgrading to Ceramic Tinting Services means long-lasting protection against extreme heat, better cabin comfort, and superior durability that resists fading over time. It’s not just about style—it’s about keeping your car cooler, safer, and more efficient on every drive.
Get Expert Results with the Correct Car Tinting Kit
When it comes to applying tint films to your car’s windows, having a fully stocked car tinting kit is crucial. You can get a professional-looking tint job without paying for professional installation if you have the correct equipment and a little practice. Every tool in the kit serves a specific function, and when used properly, it guarantees flawless application, accurate cutting, and a smooth finish. Make sure your kit contains all of these tools if you’re prepared to try car tinting kits on your own. A car tinting kit is a necessary investment for both do-it-yourselfers and pros, regardless of whether you’re upgrading your vehicle for improved heat protection, UV blocking, or privacy.
Are you prepared to begin your tinting project? Get a special 10% off your first purchase when you reserve your car tinting kit now! Get the ideal car tint now to avoid missing out!